Our mobile rider app (Tripshot) allows you to pay & board via mobile ticketing, plan your trip, track your bus, and receive push notification alerts specific to your route and even specific to your preferred departures. We will also continue to communicate with you through email and through the Updates & Alerts box on your shuttle’s dedicated webpage. Check out our Tripshot Quick Start Guide.
Illustrated instructions are provided below.
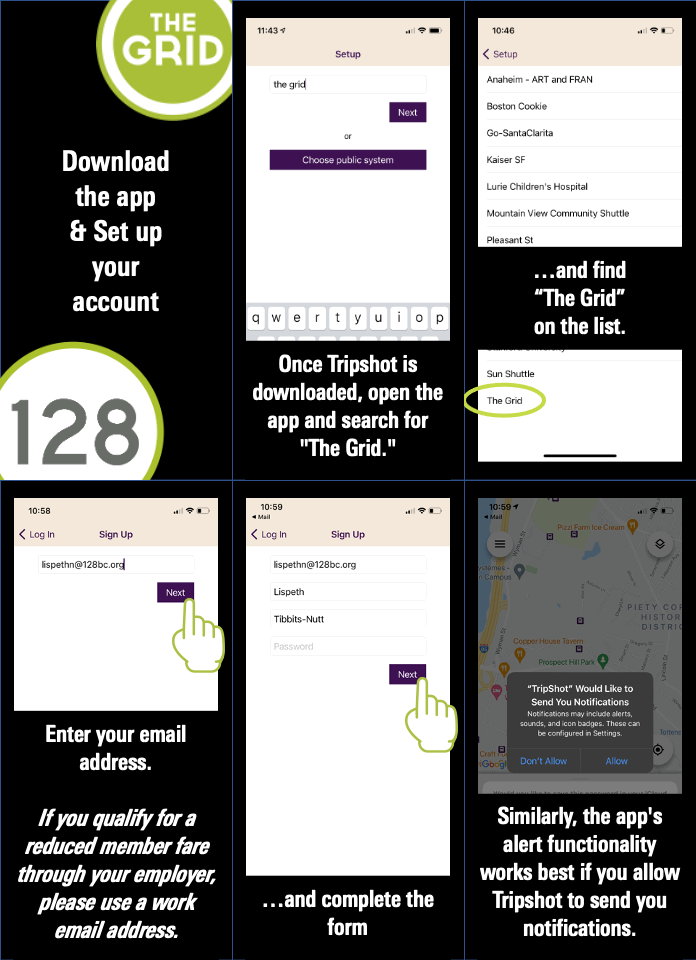
Download the app & set up your account
Download the app & set up your account
For full functionality, set up an account using a work email address and allow Tripshot to use your location & send you notifications. Full instructions below.- Using your phone’s app store, search for and download “Tripshot.” Or if you’re currently on your phone, you can just follow this link. If you’re on your computer but have your phone with you, you can scan this QR code with your phone’s camera:
- Once Tripshot is downloaded, open the app and search for “The Grid.” Or, click “Choose public system” and select it from the list.
- Select “Sign up” to create an account.
- Enter your email address. If you qualify for a reduced member fare through your employer, please use a work email address.
- Tripshot will then email you a link to confirm your account. Follow the provided link and complete the form.
- The app’s trip planning functionality works best if you allow Tripshot to use your location.
- Similarly, the app’s departure-specific alert functionality works best if you allow Tripshot to send you notifications.
Plan a trip
Plan a trip
Explore the map to view all system stops, and click a stop of interest to begin building a trip. See full instructions below.- You can jump straight to trip planning from the “Explore” function, which is the default screen upon launching the app. Find a stop of interest, and then touch “From” or “To” at the bottom of the screen, depending upon whether you would like this to be your origin or destination. The app will automatically use your current location as the other point.
- You can also enter your origin or destination by:
- typing in any address;
- beginning to type the address of a 128BC shuttle stop and selecting from the options that pop up;
- scrolling through the complete list of stops;
- or selecting “Choose On Map” and finding your destination geographically.
- If you attempt to connect between two stops on different routes, the trip planner will tell you that “no route on a shuttle service could be found.”
- If either your origin or your destination is not a 128BC shuttle stop, your directions will include a walking, biking, or driving leg.
- You can select whether you would like the trip planner to rely upon walking, biking, or driving for non-shuttle legs by touching the settings icon directly below the origin/destination menu. (Note that there are maximum distances set by the app for walking and biking. As a result, you may encounter a “No route” message if the required walking or biking distance is too far.) From this screen, you can also select whether you would like to depart now, depart at a later date, or structure the trip around a particular arrival time.
- Click any of the displayed trip options to view a map and more detailed timetable.
- To save a trip between an origin and destination that you use frequently, touch the heart icon. (Note that you can only save trips directly from one 128BC stop to another, not trips that involve walking, biking, or driving legs.) You can access your saved trips by clicking the white heart at the top of the screen next to “Trip Planner.”
- You can also access the “Trip Planner” by clicking the road sign icon in the upper-right-hand corner of the screen.
Sign up for real-time notifications
Sign up for real-time notifications
Receive notifications when your shuttle is arriving or running late. Notifications are highly customizable, including the ability to specify your departure time and which days you commute. See full instructions below.- Notifications are set up directly from the Trip Planner.
- Touch the particular trip that you are interested in, and then swipe up to reveal the more detailed timetable.
- Click on the alarm clock icon in order to set a notification for that particular departure or arrival.
- You can then control:
- how late the shuttle needs to be in order to generate a notification;
- whether you want to be notified when the vehicle is approaching;
- whether you want to set the notification for a particular date or ‘subscribe’ to the notification on an ongoing basis;
- on which days of the week you would like to receive notifications;
- and whether you would like to receive the notification as a text message, a push notification through the app, or both.
- Be sure to click “Save.”
- You can view, edit, or delete the notifications that you’ve set up by selecting “Notifications” on the app’s sidebar.
Track your shuttle
Track your shuttle
View your shuttle’s progress toward you or toward its destination through the app’s map view.
Set up your preferred payment method
Set up your preferred payment method
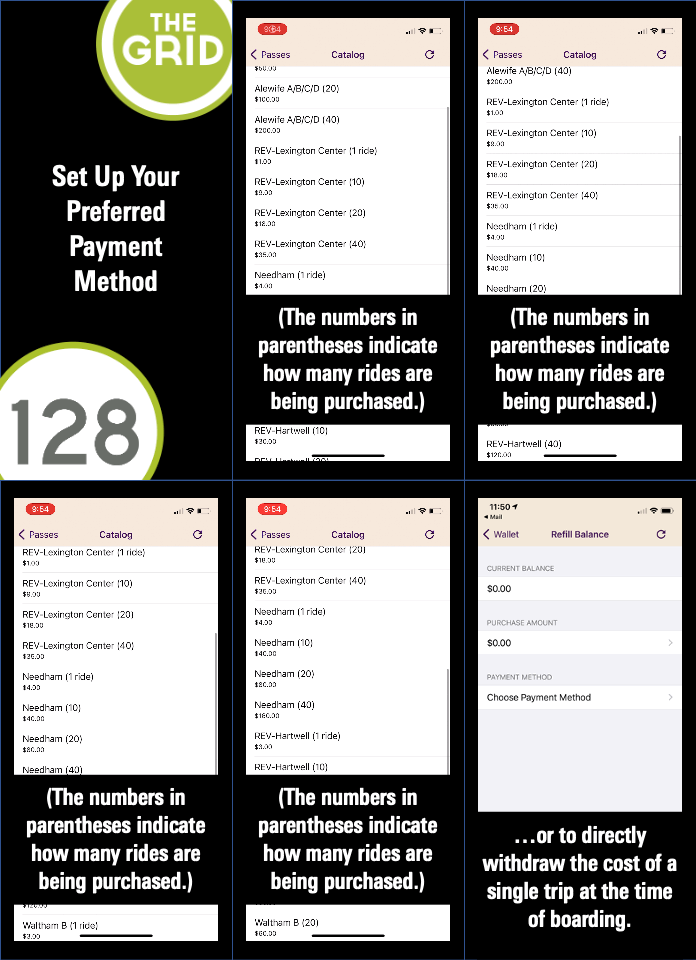
You can purchase single- or multi-ride “Passes” or pay for each ride at the time of boarding using your “Balance.” See full instructions below.- Select “Wallet” from the main menu.
- Select “Passes” to purchase single- or multi-ride passes. You need to press the + symbol to view the list of passes available to Grid riders.
- Or select “Balance” to add funds directly to your wallet, which can be used to purchase single- or multi-ride passes at a later time or to directly withdraw the cost of a single trip at the time of boarding.
- From the Wallet screen, you can also:
- View, edit, or remove saved credit cards by selecting “Saved Credit Cards.”
- View past transactions and generate receipts by selecting “Transactions.”
Board using bluetooth
Board using bluetooth
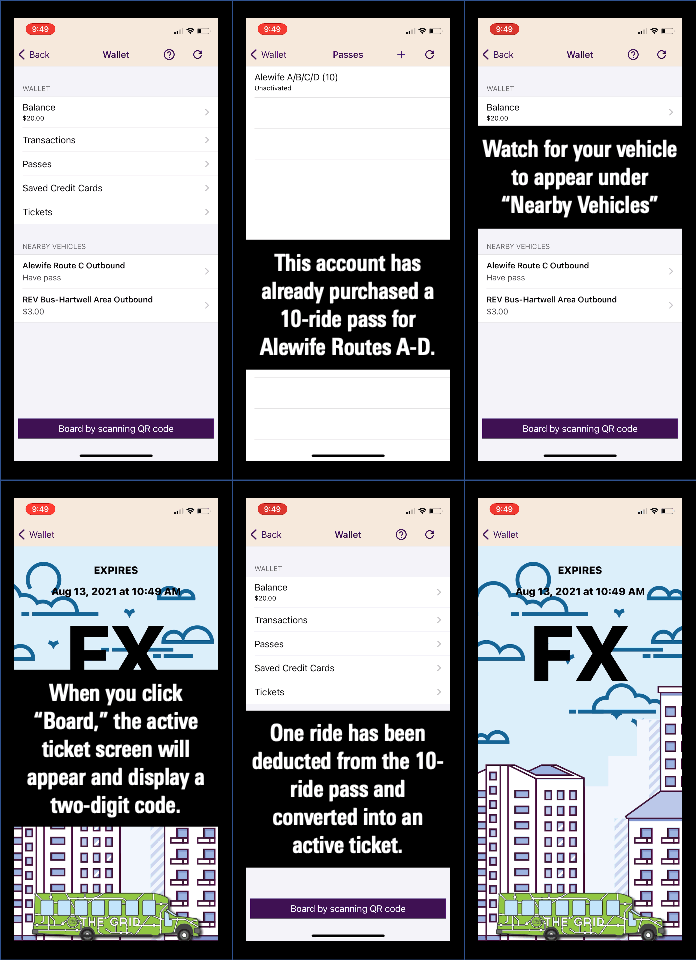
If your phone’s bluetooth is turned on, Tripshot will automatically detect approaching vehicles and display them in the “Nearby Vehicles” list. See full instructions below.- Make sure your phone’s bluetooth is turned on.
- As your shuttle is approaching, select “Wallet” from the main menu and select your shuttle from the “Nearby Vehicles” list.
- Tripshot will automatically convert one ride from your purchased “Passes” into an active ticket. If you have no purchased passes for the route you’re trying to ride, Tripshot will instead deduct the cost of a single ride from your “Balance.”
- If you have no relevant purchased passes nor sufficient balance, you will be unable to complete this step and board.
- If your employer/worksite pays the full cost of your shuttle rides and if you have received confirmation that you’ve been approved for this benefit, Tripshot will automatically generate a free ticket for you when you select your shuttle from the “Nearby Vehicles” list. You don’t need to purchase passes or add funds to your wallet.
- The active ticket screen will appear and display a two-digit code. Keep this screen open so you can show the code to your driver.
Board using QR code
Board using QR code
Every shuttle has a vehicle-specific QR code posted inside the door which you can scan from within the app in order to pay & board. See full instructions below.- Select “Wallet” from the main menu and then select “Board by scanning QR code.” Note that you must use this button within Tripshot Wallet. Scanning the QR code through your phone’s camera app will not work.
- Locate the vehicle-specific QR code just inside your shuttle’s door.
- Tripshot will automatically convert one ride from your purchased “Passes” into an active ticket. If you have no purchased passes, Tripshot will instead deduct the cost of a single ride from your “Balance.”
- If you have no relevant purchased passes nor sufficient balance, you will be unable to complete this step and board.
- If your employer/worksite pays the full cost of your shuttle rides and if you have received confirmation that you’ve been approved for this benefit, Tripshot will automatically generate a free ticket for you when you select your shuttle from the “Nearby Vehicles” list. You don’t need to purchase passes or add funds to your wallet.
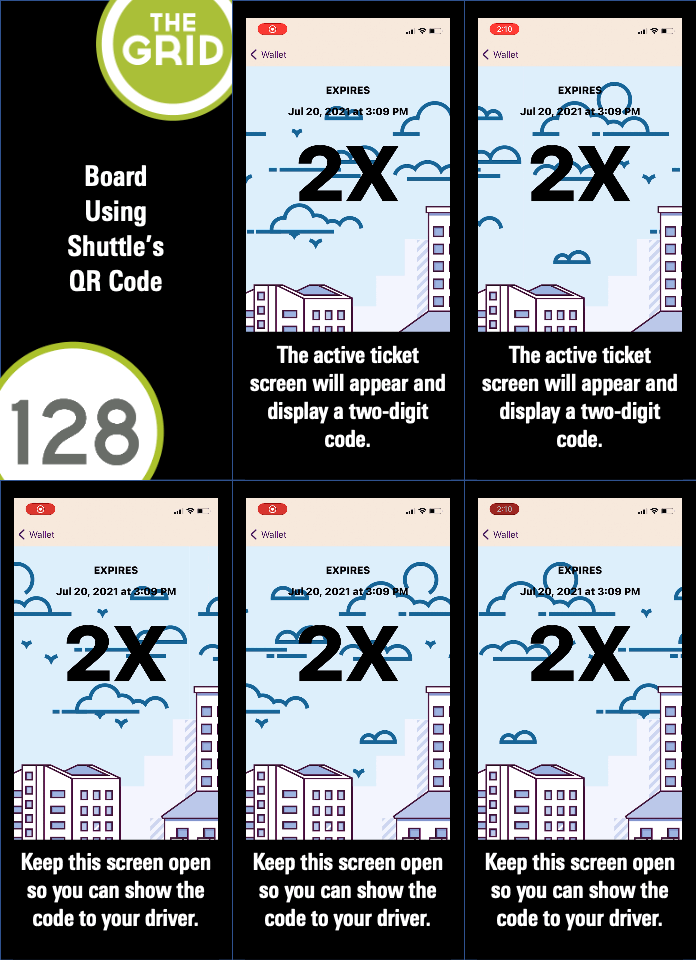
- The active ticket screen will appear and display a two-digit code. Keep this screen open so you can show the code to your driver.
Tripshot Q&A
See the Rider FAQ section below for common questions related to the mobile app and mobile ticketing. Just scroll down to “MOBILE TICKETING” and/or “FARES & MEMBERSHIP.”